
Integrate 3-Legged OAuth In Your Application
The previous guides described the general aspect of the 3-legged OAuth flows. How do you integrate this type of authentication in the Covisint Platform? The purpose of this guide is to show you how to do that. We've provided convenient Postman collections of the sequence of calls you would make.
Postman Collection:
You can find the postman collection here.
You can find more information about the APIs here. The necessary information about the API routes, body information, headers, and such are provided in the Postman collection. Please cross reference the Postman collection with this guide.
This collection is a series of sequential steps necessary to implement the various flows for 3-legged OAuth. In the Postman collection, {{baseurl}} is the production URL for a region an instance is created. In this case, you’ll be using https://api.us1.covisint.com
Note: Your tokens have a time and usage expiration. You may have to request new tokens more than once in this tutorial.
Authorization Endpoint
The resource owner needs to give the client permission to access his/her protected information. This is accomplished through authorization endpoint. From a user's perspective, you might see something like this:
[image of OAuth Consent form]
We've seen this pattern implemented various times. Many companies love using Facebook as a authorization server. If you are not logged into Facebook and want to use a specific app, it will redirect you to the Facebook login. You will log in and Facebook will show you the scopes the company wants to access, such as email. You either approve or deny and get redirected back to the company's app.
When you make a request to either get a code or access token, you'll have these parameters as part of your request:
- client_id: This is the client id of your application. You will need to log into your portal to get it.
- scope: It is space-delmited list of permissions your client requires. You will need to configured this for your app.
- redirect_uri: If the response is a success, the resource owner is redirected to a URL. This needs to be configured by you.
- response_type: This informs the authorization server which grant to perform. The response type will vary between each flow.
- state: This is mainly used for security and protect against CSRF attacks. A state will be configured for a client. The authorization server verifies a specific state is associated with the client.
Authorization Grant Flow
STEPS
1 GET: Retreive Authorization Code
The resource owner via the user agent will need to hit an endpoint that will allow him/her to enter username and password and be verified. If the resource owner's credentials are valid, an authorization code token will get passed in the URI. The user agent will need to extract that authorization code via a script and pass it to the client.
In this particular example, I pasted the URL in the postman to a browser, with valid values. I got redirected to Covisint's CCA login. Since my credentials are valid, I see the code (authorization code token) in the URL.

2 POST: Retreive Access Token And Refresh Token
The client will send this authorization code token to Covisint in order to receive an access token. If Covisint validates the client, redirect URI, and authorization code token, the client will receive an access token.
I copied the code in the URL and pasted it in the Body header, under the key code in the Postman. After a successful call, an access token and refresh token is returned.
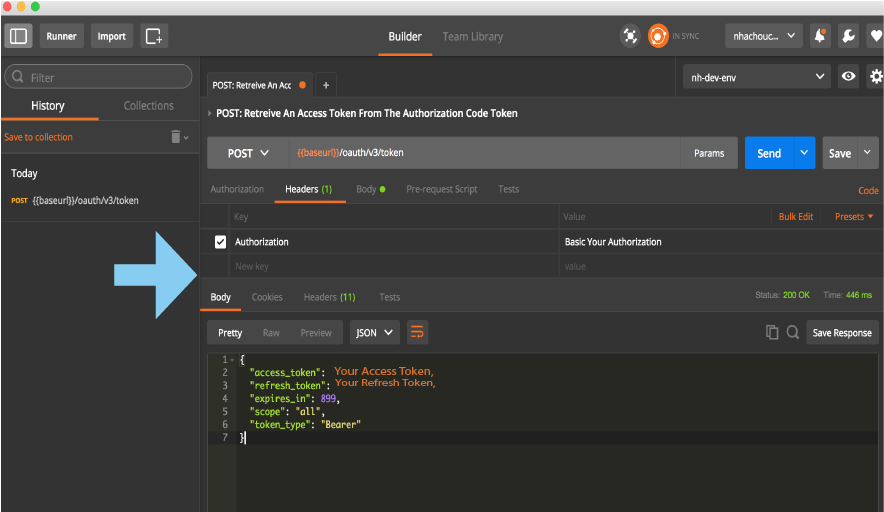
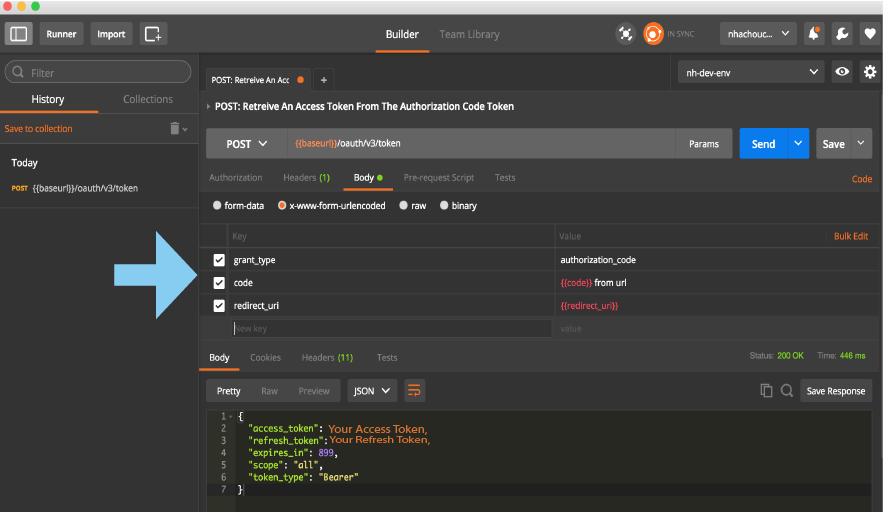
With this access token, the client can make API requests to receive protected data.
Implicit Grant Flow
STEPS
1 GET: Retreive Acess Token
The resource owner via the user agent will need to hit an endpoint that will allow him/her to enter username and password and be verified. If the resource owner's credentials are valid, an access token will get passed in the URI. The user agent will need to extract that access token via a script and pass it to the client.
Note: the web-hosted client resource is created by the developer - not Covisint. You'll need to build this in order to process the URI and extract the access_token fragment.

With this access token, the client can make API requests to receive protected data.